Utilize Moldings & Trims for Flooring Design
Introduction
Having moldings that will ensure a smooth transition is extremely important. Molding and trims provide constructional efficacy with a strong style quotient, which ensures that your flooring is both strong while also being up to the mark in its aesthetic endowments.
Why are Moldings and Trims So important?
-
What are Moldings and Trims?
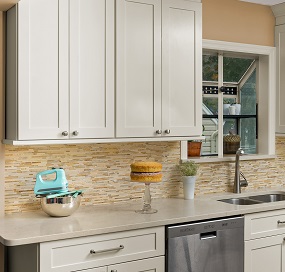
Moldings are strips of wood and other materials which are used in houses to cover gaps in walls and floors resulting from a change in the surface material or a variation in height of two adjacent surfaces. Moldings come in different shapes and sizes to be fit for gaps of various kinds.
Trims are the moldings which are used around the perimeter of windows and doors as well as on walls and floors to give them a classier look. Trims can also be used on ceilings or the intersection between ceiling and wall, in which case they are known as cornices.
Moldings and trims have been used as decorative pieces since ancient times to make the doors and windows look more impressive. By casting moldings into various attractive shapes and sizes, the doors and windows can be given a regal look.
-
Why do you need Moldings and Trims?
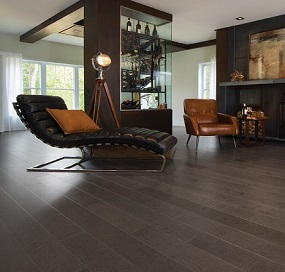
There are various advantages that accrue to house owners by installing moldings in their house. The primary role of these moldings is decorative. They make your rooms look more elegant and artistic.
Moldings are also extensively used to cover the gaps between walls, roofs, and floors. Just filling these gaps with the building material would make them look quite insipid. Hence, it’s important to shroud them in a graceful manner. Moldings are also used to give the intersection between wall and roof a more stylish look. Rather than just having 90o angles at these intersections, having beautiful cornices would be so much better!
Lastly, moldings provide additional protection to wall surfaces. Without them, walls would be more prone to damage.
Types of Molding and Trims
Moldings come in different shape and sizes which are meant to fit nicely into the plans for your rooms. There is no standard color and size of moldings, hence, every manufacturer’s moldings may have slight variations compared to others.
The fact that moldings are often made from wood is another reason why each piece might be slightly different. Wood can take a color or stain naturally and so, the end product may have a slightly different hue from when it was first produced.
Let’s look at some of the most popular types of moldings that are there:
-
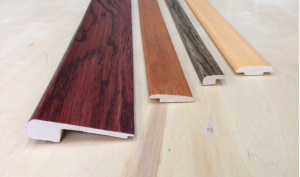
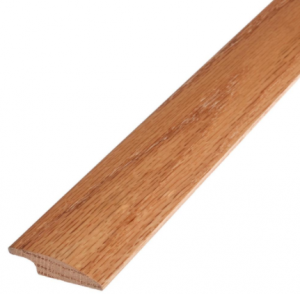
Quarter Round
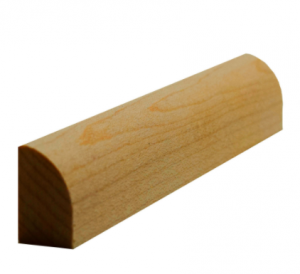
These types of moldings are very common and usually come in a size of ¾ inches. They are curved in shape and primarily used to cover the expansion gap provided between flooring and the wall. As is obvious from this description, they are placed at the intersection of the floor with the wall.
It is very easy to install these quarter round moldings in place but they have to be removed if the flooring of the room is being changed completely. Manufacturers try and produce quarter rounds which match the color of the floor or, at least, that of the other trimmings in the room.
-
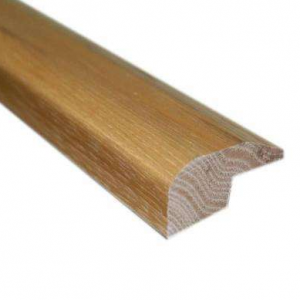
T-Molding
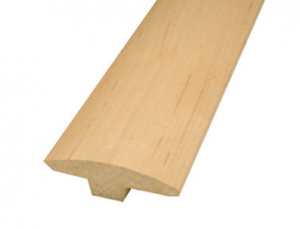
It’s easy to figure out why the T-moldings are named as such. Their shape resembles a ‘T.’ These types of moldings are used primarily when there is a transition from one-floor surface to another. The stalk of the molding is placed in the gap between the two surfaces and the horizontal region overhangs part of the two surfaces allowing a smooth and unobtrusive transition.
There are two things which are necessary for T-moldings to be employed: both the surfaces should be hard and of the same height. Such molding is also used in doorways if the same kind of flooring is being used in floors across the house.
-
Wall Base
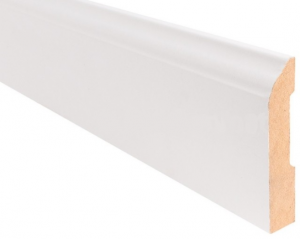
Like quarter round, wall base moldings are also used for covering expansion gaps at the intersection of wall and floor. Unlike quarter round, though, these moldings have no common size and they range from 2 inches to 5 inches. They are usually in the shape of shoes. Whether you want them to be plain in design or more decorative, it can be easily achieved.
-
Flush Reducer
Flush reducers are used to allow smooth transitions from a hard surface to a soft one like a carpet, vinyl or tiles. They become extremely important when you have a hardwood floor that has been connected to the subfloor using nails or glue.
There are some conditions which are necessary for the use of flush reducer. It can be nailed on to the subfloor or stuck using construction adhesive. This kind of molding cannot be used with a floating floor as it needs room to move which flush reducer doesn’t provide.
-
Overlap Reducer
Since floating floors require expansion gaps, flush reducers can’t be used with them. Hence, we have overlap reducers for such situations. When you are transitioning from a floating floor on to a softer floor, this type of molding is required.
An overlap reducer provides an overlapping protrusion which covers the expansion gap. This gap provided the necessary space for the floating floor to move.
-
Square Nose Reducer
Also known as End Cap, a square nose reducer also assists the transition from a hard surface to a softer surface. But while the flush and overlap reducers have a sloping edge towards the softer surface, square nose reducer has a square-shaped one.
This type of molding also has an overhanging protrusion for covering expansion gap but it can also be used with hard surface floors.
-
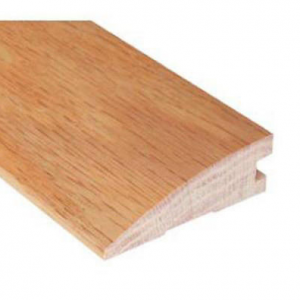
Threshold
When a hardwood or laminate floor is juxtaposed with a floor of different height, threshold molding becomes important. Instead of a gradual slope towards the other surface, the threshold to has a squared edge.
Like other moldings discussed so far, the threshold also has an overhang which covers the hard surface and transitions to it like a T-molding. Similarly, on the other end also, it has a similar angled cut to transition to the other floor before forming a vertical barrier to the softer surface. Both the threshold and square nose reducer are useful when a hardwood surface is next to a sliding glass door track.
-
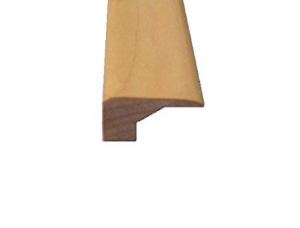
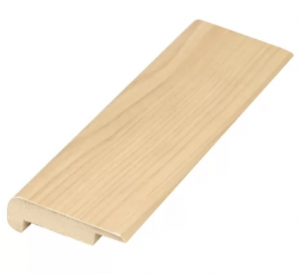
Flush Stair Nose
Also known as bullnose pieces or step downs, flush stair noses are meant for covering and overhanging the front edge of a step when floorboards are being used to cover stairs. These flush stair noses can be easily placed beside floorboards to provide a smooth and classy transition.
-
Overlap Stair Nose
If the steps have a floating floor system, the room is required for the expansion gap. An overlap stair nose does provide a protruding overlap which hides the expansion gap and thereby allows for movement of the floating surface.
This kind of stair noses can only be used at the edge of the stairs as your floorboards can’t be floated on discrete stairs due to them being attached to a floor surface. They are also used only for the top of the staircase for the reasons stated above.
-
Stair Treads and Stair Risers
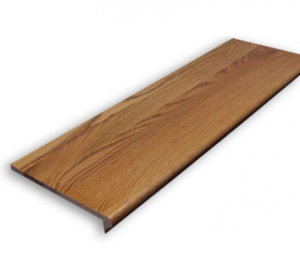
These two are highly useful construction pieces made of wood. A stair tread is an entire staircase that you can easily nail or glue down. This would rid you of the need to have a long and arduous construction of the whole thing with floorboards and stair noses.
Stair risers are the vertical elements in a staircase. They too make the job of creating a staircase easier. These two objects are also not usually available at flooring manufacturers shop but at the stores of independent companies.
How to Install Molding & Trim?

-
Should You Have a Transition or Not?
Times have changed and a growing number of people who were earlier hesitant to use transition piece in doorways are showing an inclination for it. The reason is simple: when the seasons change, there is a contraction or extension of the wooden flooring. This becomes even more so if you have floating floors. They are certain to expand and contract with changes in temperature and weather. Therefore, it becomes essential to provide some expansion gap. The best way to cover this expansion gap is, indeed, transitions. Earlier it was believed that transitions were needed only for wooden floors but researches have shown that even laminate floorings expand and contract. Doorways are usually the most important part of the house where transitions are needed as it is in these spaces that the flooring comes apart when seasons change.
But whether you choose transitions or not depends on three things in the end: how much does the flooring material in your house expand or contract, are you using floating flooring and whether there is the kind of molding that is suited to your flooring system.
-
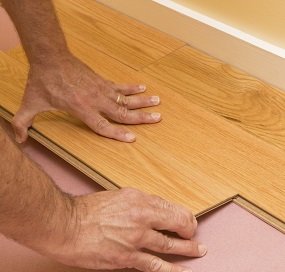
Installation Methods
Most type of moldings is put in place by being nailed down. The number and frequency of nails varies and differs according to the type and size. The other option in case of various moldings is gluing them (as in the case of T-moldings) or using construction adhesive to attach them to the subfloor.
It’s also necessary to take the following precautions while installing molding transitions:
- There should always be a little gap between the flooring and transition molding. Otherwise, when the flooring expands, it could push against the molding and break or squeak
- Transition pieces should not be nailed down to the sub-floor or floating floor as they move with a change in weather and transitions don’t. So, breakage may occur
- When using a quarter round molding, never stick it or nail it to the sub-floor as the latter is prone to expansion and therefore breakage due to having no space left
- Ensure that the adhesive you are using with moldings is also compatible with the surfaces which the molding is located between
Baseball trims can also often cause problems while installation due to them easily getting misaligned. The solution often is to use scraps of wood or parts cut from trims to fill up the gaps that have opened up. Gluing or nailing two pieces of baseboard trim can be dangerous as they can get split with a change in weather.
-
Tips
Try and find trims that match in color and grain with the rest of the room unless you wish to paint them all. Also, it’s useful to get trimmings from miter cuts.
Moldings should be acclimated for 72 hours before being fully exposed. Do remember that nailing down moldings could lead to splintering. So, have pre-drilling done. Plus, shoe edge and quarter round moldings should not have nails being driven in a downward angle as that could cause problems with the expansion.
Conclusion
Moldings are as essential to the construction and interior decoration of the house like any other part of the process. To secure your house’s flooring against variations of weather as well as raise its aesthetic appeal, choose the best possible molding pieces as well as the best trimmings. Make your house look appealing.